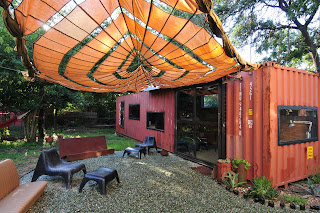
Amazingly it's been over a month since I updated this. Some days I feel like almost nothing has happened since then, but a lot has taken place. On a plane headed back from Minneapolis a few months ago, I began with a basic idea of how I wanted to layout windows and a floor plan. I scribbled down a rough sketch and let the visual aesthetic settle for a while. I knew that I wanted to use as many recycled materials as possible, so I was open to the design changing organically as I found suitable materials.
Shortly before the container was delivered I bought a set of old office cubicle walls that had thick tempered 6 foot tall glass in them. Perfect. A little bit of disassembly was required, but this got me the long rectangular shaped glass I was looking for at a fraction of the cost of custom built commercial windows. Even custom commercial units would need reinforced angle iron to frame them into the container walls. Instead, I decided to make the angle iron the entire window frame to keep it simple and functional and give it a more utilitarian feel. I'm not out to make a standard house with standard windows.
To help retain the strength of the structural walls I used thick angle iron and a band saw to cut out appropriate frames for my new windows. After much debate and thought between Margot and I, we came up with an updated layout that was surprisingly similar to the scribbles I put down on paper during our trip.
My welding skills are improving, but it's a slow process. Some of the windows I've built are fixed and will not be opened and some swing out to open from a top pivot point. The opening ones took three rounds of development, but I'm pleased with how they are turning out. We'll have seven windows and one large sliding glass door when finished and I've officially built and installed four of the seven with the other frames already assembled and waiting for holes.
I found the plasma cutter to be the easiest solution to cutting into the container and the band saw is definitely the most precise tool for cutting my window frames. It's fun and a little scary to hear and feel the container expand and contract as you cut out sections and then see and feel it tighten back up as the super strong frames are welded in place.
I also did some creative trading and managed to come up with two large commercial sliding doors that I plan to combine into one big heavy barn-door style hanging door. Wish me luck on that one.
We've also determined that a grass roof is definitely in the future plan for energy efficiency and aesthetic appeal, so I plan to put in roof reinforcements that will be hidden in the walls. This will take a bit of work this week as I finish the last of the windows and also begin the task of getting the big door together.
I'm ordering the air conditioner/heater this week and have decided to buy a mini-split unit for its efficiency, low-noise output and unobtrusive ventless output. I also need to buy the electrical materials this week and get it wired up soon. I ordered a bio-based spray foam insulation to spray on the walls to insulate and seal up the structure. I look forward to installing that as it means I'm nearing completion or at least a usable point of the project. The plans for the wall surface are changing as I discover new materials. Standard sheetrock is out and finish plywood is simply too expensive and certainly not that eco-friendly. Anyone got any recommendations? This will develop soon I'm sure.
I'll try to update this more often as there are finally interesting things to see that are developing quickly.
For now, the rest of the story can be told by the photos on the flickr page here: http://www.flickr.com/photos/theonegoodeye/sets/72157622636818317/
.
Thanks for reading!


